Saturday, August 20, 2011

What’s Black and White and Yummy All Over?

This is one of those recipes that I originally made a reallly long time ago, but was definitely worth the wait before it made its starring appearance here on the blog. I brought these to a birthday party at work and they were a big hit.

Black Bottom Cupcakes (adapted from here)

What You’ll Need

White Filling

  • 1 (8 oz.) package fat free cream cheese
  • 1 egg (or ¼ cup egg substitute)
  • ⅓ cup sugar
  • ⅛ tsp salt
  • 1 cup semisweet chocolate chips

Black Filling

  • 1 ½ cups all-purpose flour
  • 1 cup sugar
  • ¼ cup cocoa powder
  • 1 tsp baking soda
  • ½ tsp salt
  • 1 cup water
  • ⅓ cup vegetable oil
  • 1 tbsp distilled white vinegar
  • 1 tsp vanilla extract

What To Do

Preheat your oven to 350°F. Grease a muffin tin with Pam or butter, or, alternately, line with paper cups.

In a large mixing bowl, beat together the ingredients for the white filling (cream cheese, egg, sugar, and salt.) Fold in the chocolate chips afterwards.

IMG_1929IMG_1930

In a separate bowl, mix together the dry ingredients for the black filling (flour, sugar, cocoa powder, baking soda, and salt.)

IMG_1931

Gradually add the wet ingredients (water, vinegar, oil, vanilla) to the dry mix. Mix well; the batter will be thin.

IMG_1932

Fill the muffin cups ⅓ full with the chocolate batter. Top with one large spoonful of the white filling.

IMG_1933

Bake for 30-35 minutes or until an inserted toothpick comes out clean.

IMG_1934

You’ll know these are done when the white portion of the cupcakes starts to turn a slight golden brown.

IMG_1935

Although it may be sacrilege to say this, I’m not a huge cheesecake fan. I find its richness to be overwhelming, and I can usually only get through a bite or two of the pure, unadulterated versions. I do, however, love the flavor when there’s something else to cut through the creaminess of cheesecake, and these were a perfect example. The strong but not overpowering chocolate portion is a great counterpart to the cheesecake portion, and the chocolate chips provide enough texture to keep these from getting too mushy of a texture.

IMG_1937

On top of the great taste, they look pretty darned impressive when you’re eating them. Everyone you share them with will be sure to think you spent much longer slaving away in the kitchen than you actually did – don’t spill the beans that these are a cinch to cook!

Sunday, August 7, 2011

Corn Spoon Bread

Growing up, we always spent Christmas Day at my Uncle Mike and Aunt Linda’s house. Aunt Linda, aka The Kitchen Nazi, always made a delicious spread for the holiday, but one dish has always stuck out in my mind. Her corn pudding always disappeared quickly because it was rich, comforting, slightly sweet but oh so savory. I don’t know why I never thought to make this before now, but I’m so glad I finally did! The version I made isn’t exactly the same as the one from my childhood, but it sure brings back all those delectable memories.

Corn Spoon Bread (adapted from here)

What You’ll Need:

    • 1 8 oz. package of fat free cream cheese, softened
    • ⅓ cup sugar
    • 1 cup skim milk
    • ½ cup egg substitute
    • 1 16 oz. bag of frozen corn, thawed
    • 1 14.75 oz. can cream style corn
    • 1 8.5 oz. package corn bread/muffin mix (I used Jiffy)
    • 2 tablespoons margarine, melted
    • 1 teaspoon salt
    • ¼ teaspoon ground nutmeg
    • Dash pepper

IMG_2152

What To Do:

Preheat your oven to 325°F. In a large bowl, mix together the cream cheese and the sugar until it is smooth and uniform.

IMG_2155

Slowly drizzle in the milk and beat until smooth.

IMG_2156

Add the Egg Beaters, margarine, nutmeg, salt, and pepper. Continue to beat until smooth.

IMG_2158

Add the frozen corn and creamed corn; mix well.

IMG_2159

Add the cornbread mix and stir until moistened and no clumps remain, but do not over-mix. Pour into a greased (or sprayed with Pam) casserole dish.

IMG_2160

Bake for about 90 minutes, or until a toothpick/knife inserted into the center comes out clean.

IMG_2161

Let stand for about 5 minutes before serving.

IMG_2162

This was everything I remembered and was hoping for. It was creamy, gooey, slightly sweet and slightly salty, and just a perfect custardy consistency. I served this with my spicy pork chops and escarole and beans, and it complimented both foods beautifully. You can also cook this spoon bread in a slow cooker – just grease the slow cooker bowl and cook on high for 3-4 hours, or low for about 6-8. I will definitely be making this year round since it is so simple to make and is so flat out yummy!

Sunday, June 19, 2011

Pork ‘n Beans

My labmate, Danielle, and I are really good at wasting time by talking about completely random crap. One of our favorite topics, by far, is food. Like me, she will eat the hell out of anything involving cheese, which is undoubtedly the world’s most magical food. Now that we’re both trying to eat healthy(er) – or at least most of the time – cheese is a little less prevalent in our conversations. The other day she was telling me about a delicious dish that I just HAD to try – escarole and white beans. Since her recipe only instructed me to use “a shit-ton of garlic”, some kind of wilty green vegetable, and white beans, I made my own variation. I served this with a grilled, bone-in pork chop and sweet potato fries dusted with chipotle powder (not homemade) for one helluva meal.

What You’ll Need:

Wilty Green Vegetable and White Beans

  • 1 bag or 1 large bunch of fresh escarole or spinach – traditionally this is made with escarole, but I’m contrary and I like spinach better
  • 1 can cannellini (white) beans, NOT drained
  • A shit-ton of garlic (about 12 cloves), peeled and roughly chopped
  • Copious amounts of black  pepper
  • Pinch of kosher salt
  • 1 tbsp olive oil

Grilled Pork Chop

  • 2 large, bone-in pork chops (appx. 5 oz. each)
  • Freshly ground black pepper
  • Kosher salt
  • A pinch of the following spices:
    • Chipotle powder
    • Cayenne pepper
    • Smoked paprika
    • Garlic powder

What To Do:

Heat your grill until is is nice and smoking hot.

IMG_2077

While it’s preheating, lightly dust both sides of your pork chop with the chipotle powder, paprika, cayenne, and garlic powder. Generously cover both sides with salt and pepper. Grill the pork chop for about 5 minutes per side. Don’t make the mistake of repeatedly flipping it – you want to get a nice sear on both sides!

After flipping your pork chops to cook on the second side, heat a large sauté pan and the olive oil on medium heat until the oil gets hot. Add your shit-ton of garlic and cook for 1-2 minutes, or until the garlic starts to turn golden brown. My shit-ton of garlic was approximately this much, and in this case “roughly chopped” meant hacked into large hunks:

IMG_2079

While the garlic is simmering away, thoroughly rinse and drain your spinach, escarole, kale, collard greens, or whatever wilty vegetable you have chosen. After shaking off most of the water, dump the contents into the pan and cover.

IMG_2081

After a minute or two, stir the vegetables so that the already wilted leaves get moved to the top of the pan.

IMG_2082

By now, the pork chops should be cooked. Remove them from the grill when they are just barely pink on the inside, and let them rest while the veggies finish cooking. This will ensure they are fully cooked by the time you sit down to eat, but will remain most and avoid that dried cardboard texture poorly cooked pork chops can have.

Once most of the leaves are wilted, dump in the entire can of cannellini beans, goo and all. Cook for another 2-3 minutes, or until the beans get hot. By this point, all of the veggies will be cooked down and the bean goo will have condensed into a nice thick sauce that coats the leaves.

IMG_2083

Liberally douse the entire pan with freshly ground black pepper; mix, then repeat the step. It may seem like a lot of pepper, but it helps jazz up what could otherwise be fairly bland.

Side Note: At this point, the pork chops have rested for a few minutes and are perfectly cooked. Even though the USDA just changed their guidelines on how to properly cook pork, I still prefer my pig to be a uniform white color without any hints of pink (blame it on my many, many hours spent working with foodborne pathogenic bacteria).

IMG_2085

Like I said earlier, this is one helluva meal. The sweet potato fries with chipotle seasoning are from the Alexia brand, which I think are the best prepackaged french fry option out there, both in terms of healthfulness and flavor. As for the home cooked items, the pork literally exploded with flavor. I know a lot of people think pork can be boring and tasteless, but this was tender, juicy, and absolutely delicious. The cayenne and chipotle blended well for a punch of heat that was by no means overpowering, but was definitely addictive. I kept wishing there was more meat left for me to eat. The veggies were, in a word, amazeballs. Even though they are so incredibly simple to make, I couldn’t get enough of them. The addition of the white beans plus the ridiculously huge amount of garlic is enough to make any spinach hater happy, but I thought they only helped to make the spinach shine. I seriously could have eaten the entire batch of veggies alone for my meal and been perfectly happy, but then again, I am the kid who announced to her sixth grade class that my favorite food was broccoli. (Yes, that was met with the jeers and derision you would expect.) I can’t recommend this entire meal highly enough – it’s fast, super easy, and it tastes like you put so much more effort into it than you really did! And just to top it all off – it will get you pretty darned close to what the new “healthy meal” is supposed to look like. Enjoy!

Thursday, May 26, 2011

Welcome back, Kotter.

Well aren’t you just surprised to see me again! It’s been forever, I know. Sometimes life just gets in the way. I usually test out most of the recipes that end up on this blog on the weekends, when I have a fun thing called “free time.” It’s still a foreign concept to me. Between having every second of the last month’s weekends packed with majorly important stuff (Ph.D. commencement, bridal shower, dying from the flu, etc.) and trying to go to the gym 3-4x a week (still going strong after 3 months!), there’s literally not been a day when I’ve had the time or energy to sit down and write a post. My laziness has been transferred from not exercising to not blogging.  Sorry, pals.

ANYWAYS. Part of the shift in seasons, which seems to be happening so slowly this year, is the inevitable changes in foods that make their way onto my dinner plate.  As soon as it’s feasible for me to grill, I cook the majority of my meals that way so that my apartment doesn’t reach thermonuclear heat levels. Since even putting my stove on for any lengthy period makes it a sauna, I try to limit hot cooking as much as possible. My favorite way to avoid unnecessary heat is to make a giant pasta salad and eat it throughout the week. This conveniently cuts down on cooking for the week, and allows you to throw in whatever random produce you might have laying around. I never met a pasta salad I didn’t like, and this is the most basic, year-round version I’ve come up with. Since it was torrential downpouring on Friday, when my farmers market was open, I didn’t catch anything fresh, so this features frozen veggies, but feel free to substitute whatever you have on hand.

Simple Pasta Salad (designed by me!)

What You’ll Need

  • 1 box of pasta (typically rotini, cavatappi, farfalle, or any other pasta with a squiggly shape that will trap the dressing well)
  • 1 bag frozen mixed vegetable (carrots, corn, green beans)
  • 1 ham steak (¼” thick – may purchase at deli or buy Hatfield’s prepackaged)
  • 1 cup reduced fat or fat-free mayo
  • 1 tsp garlic salt
  • 1 tsp onion powder
  • 1 tsp celery salt
  • Copious amounts of black pepper
  • Salt to taste

What To Do:

Cook the pasta according to the directions on the box. Even though I only eat whole wheat pasta when serving it hot with a tomato or alfredo sauce, I almost always use regular white pasta when making salads. I think the nuttiness of whole wheat pasta might overwhelm the other flavors here, and make it a heavier dish.

IMG_2043

I forget the name of these little guys, but they were shrimpy in size and had 3 fun spirals on each side. Good enough for me.

After the pasta is cooked to al dente perfection (seriously, you don’t want it mushy here), rinse it under cold water for about 2 minutes. You can use a spoon or your hands to continuously move the pasta so that all of it will be chilled. Keep it in the colander and let it drain while preparing the rest of the ingredients.

Put the frozen veggies in a saucepot and just cover them with water. Heat on high until they just come to a boil, then remove them from the heat.

While the veggies are cooking, cut the ham steak into ¼” cubes.

IMG_2038

Dump the pasta into a large mixing bowl. Transfer the veggies to the colander, then rinse them with cold water just as you did for the pasta. Once they are no longer hot, dump them on top of the pasta, and add the ham cubes.

IMG_2044

Add the mayo and stir well so that all of the pasta is evenly coated. Full disclosure: I don’t actually measure how much mayo I put in. I approximated that it was about a cup, but it definitely depends on a) what ingredients you’re including in your salad and b) how much you like mayo. While I like the flavor, I’m one of those people who doesn’t like things overly mayo-ey. You can add more or less to get it to the consistency you like – I would say this one ended up “lightly” mayo-ed. If 1 cup seems like a lot, remember that you have an entire pound of pasta, veggies, and meat in there – it’s not as much as it seems.

Add the celery salt, garlic salt, and onion powder, then mix well. As for pepper, I usually add an even black layer over the top of the salad, which is about 3 tbsp worth. It seems like pepper overkill, but this is what gives the salad it’s great flavor, so don’t skimp! Give everything a really good stirring so that the spices aren’t clumped in any one area.

IMG_2045

I recommend chilling this for an hour before eating, but you can also serve it right away if it’s mealtime. If you don’t have time to pre-chill it, then it’s very important to make sure you rinse the pasta and veggies until they’re cool to the touch.

I served this with a grilled BBQ chicken breast and some oven-baked garlic bread. What an easy, tasty, and light summer meal!

Monday, May 2, 2011

Jalapeno Wonton Poppers

Two weeks ago, my beloved yet disastrous New York Rangers were still in the playoffs, and our hopes were very much alive that they might actually manage to beat the #1 ranked Washington Capitals. Alas, it was not to be. Despite that letdown, we still had lots of yummy food to nosh on while we watched the game! I made a really yummy cold Asian noodle salad that I forgot to take pictures of, grilled chicken wings with my favorite marinade, and these jalapeno poppers as an appetizer.

Jalapeno Wonton Poppers (adapted from here)

IMG_1973

What You Need

  • 1 8 oz. package fat free cream cheese, softened
  • 1 4 oz. can chopped green chilies
  • 1 package wonton or egg roll wrappers
  • 2-3 tbsp olive oil

What To Do

Let the cream cheese sit at room temperature until it is soft and no longer cold to the touch. In a medium mixing bowl, combine the green chilies and the cream cheese. Preheat the oven to 475F.

IMG_1974IMG_1975

My local grocery store didn’t have wonton wrappers, so I bought egg roll wrappers and cut the entire package into quarters.

IMG_1976

First, have a small bowl of lukewarm water handy to dip your fingers into. Next, place 1 tbsp of filling onto the center of each wrapper.

IMG_1977

Moisten your fingers in the water, then dampen two edges of the wrapper. Fold the wonton into a triangle, then press and pinch the edges together. You can then fold them into a uniform, pretty pattern, or you can just randomly mush them together like I did.

IMG_1978

Instead of forming these into “wontons,” they turned into little jalapeno purses. The original recipe said to deep fry these, but a) I don’t have a deep fryer, and b) I don’t tend to eat a lot of fried foods. Instead, I brushed the purses lightly with olive oil, then baked them for 5 minutes.

IMG_1979

A few of my poppers…popped. Otherwise, these came out bubbling hot and lightly crunchy. Overall, this recipe made about 50 poppers, which was way more than 4 people could eat in one evening. Even after reheating these in the microwave, they were still crunchy and very tasty! You can eat these plain, or dip them into sweet chili sauce for a little extra kick.  It took me about a half hour to put these together, but it was very easy to do and would be a great way to involve your kids/spouse in preparing part of your meal. This has definitely entered my party menu rotation and I look forward to having an excuse to make and eat them again soon!

Wednesday, April 13, 2011

Funky Fusion Fajitas

I don’t know about all of you, but I am hopelessly addicted to reality TV cooking competition shows. I’ve seen every episode of every season of my favorites, Top Chef(and all its iterations), Man vs. Food, and Hell’s Kitchen. I missed some of the first season of another great show, Throwdown! With Bobby Flay, currently airing on the Food Network, but I’ve caught up on almost all of them through marathons and reruns. If you haven’t seen the show, famous Iron Chef Bobby Flay travels around the country and challenges local chefs or regular people who have become famous for perfecting their “signature dish”. This show has provided me with numerous places to eat in the NYC area, and all of them have been fantastic – I cannot overstate how highly I recommend Taim for their falafel, Schnipper's for Sloppy Joes + Mac n’ Cheese, or A Salt and Battery for fish and chips. My best pal Molly knocked one out of the park when she gave me the Throwdown! cookbook for Christmas. It contains more than 100 recipes from the show, and I was super excited to find the falafel AND fish and chips recipes were included! I decided to try the recipe for steak fajitas first, since they looked delicious on the show and they seemed fairly easy to make. Bobby Flay lost this throwdown to Father Leo Patalinghug, a Catholic priest from Maryland who is famous for his funky fajitas, so I decided to make Father Leo’s version. Bobby’s version will no doubt be made very soon, since fajitas are a favorite in our household.

IMG_1914IMG_1917

Father Leo’s Funky Fusion Fajitas from Bobby Flay’s Throwdown! Cookbook

What You’ll Need

  • ¼ cup white wine
  • ¼ cup low-sodium soy sauce
  • ¼ cup red wine vinegar
  • ¼ cup + 2 tbsp olive oil
  • 2 tbsp ketchup (Heinz.  There is no other option.)
  • 1 cup firmly packed medium or dark brown sugar
  • 3 cloves garlic, minced
  • 1 tbsp ground ginger
  • 1 tsp red pepper flakes
  • 1 tsp garlic powder
  • Kosher salt
  • Freshly ground black pepper
  • 1 (1 ¼ lb) flank steak
  • ½ red onion sliced into thin (½”) crescents
  • 1 green bell pepper cut into ¼” strips
  • 1 yellow or red bell pepper cut into ¼” strips
  • 4 green onions (both white and green parts) sliced into ¼” pieces
  • 12 (8”) flour tortillas, warmed
  • Guacamole
  • Screamin’ Sour Cream

Screamin’ Sour Cream

  • ½ cup fat free sour cream
  • 2 tbsp hot sauce (Frank’s.  There is no other option.)
  • ½ tsp kosher salt
  • ½ tsp freshly ground black pepper
  • 1 tsp garlic powder

What To Do:

In a large bowl, whisk together the wine, soy sauce, vinegar, ¼ cup olive oil, ketchup, brown sugar, 2 of the garlic cloves, ginger, 2 tsp of kosher salt, 1 tsp of black pepper, red pepper flakes, and the garlic powder. Set aside about ½ cup in a small bowl to serve with the cooked fajitas.

IMG_1918

The marinade will be a viscous, molasses-like consistency that smells fantabulous.

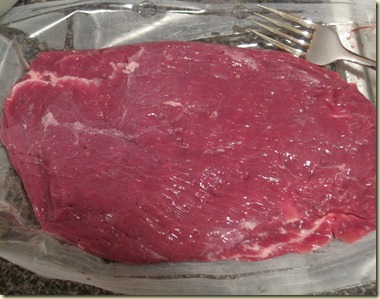
Remove the steak from its packaging. Poke it all over with a fork so that the marinade will be able to penetrate beyond the surface of the meat.
IMG_1920

Flank steaks are fairly lean, so there shouldn’t be too much extra fat to trim off of the steak. They are also long and thin, which allows them to cook quickly without giving up any of their tenderness, making them ideal for this dish. If you can’t find flank steaks, you can try any similar cut of meat – just avoid the shorter, fatter cuts which tend to dry out.

Place the entire steak into a large Ziploc bag. Pour the rest of the marinade from the bowl into the bag, seal, and refrigerate for at least 2 or up to 4 hours.

IMG_1921IMG_1922

About 30 minutes before you are ready to start grilling the steak, remove it from the refrigerator and hold it at room temperature. Heat your grill to medium high. Once it’s smoking hot, remove the steak from the marinade and liberally season both sides with a sprinkling of salt and pepper. Grill for about 6 minutes on each side for medium rare, or more if you prefer it more well done. Let the meat rest for about 10 minutes, while you are cooking your vegetables.

IMG_1925

While the meat is grilling, prepare the Screamin’ Sour Cream by whisking together all of the ingredients in a small bowl.

IMG_1923

Cover with Saran Wrap and refrigerate for about 30 minutes, or until you are ready to eat.

Next, slice, cut, or otherwise prepare all of your veggies.

IMG_1924

Once the meat is resting, heat the final 2 tbsp of olive oil in a large sauté pan over medium high heat. Sauté the onion, bell peppers, green onions, garlic, about 1 tbsp of the reserved marinade, and salt & pepper to taste. Stir frequently, cooking for about 6-8 minutes or until the veggies are crisp yet still tender.

IMG_1926

Slice the steak by cutting it across the grain into thin pieces.

IMG_1927

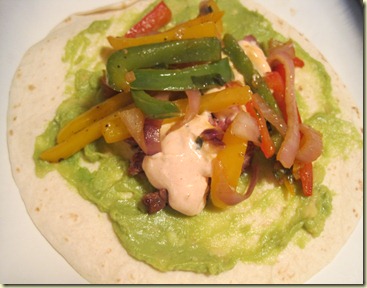
Spread the bottom of your tortilla with about a tablespoon of guacamole (I got lazy and used Trader Joe’s guac, since it’s cheaper than making it on my own and just as yummy!). Fill the tortilla with 5 or 6 slices of meat, a scoopful of vegetables, some sour cream, and a drizzle of the reserved marinade.
IMG_1928

Give thanks for this awesome meal, and enjoy the feast!

These are, bar none, the best fajitas I’ve ever eaten in my life. The marinade is really what makes the difference, since the rest of the ingredients are fairly standard. The sauce is tangy, slightly sweet, and has enough to kick to avoid being cloying. I couldn’t stop drizzling the leftover marinade onto mine, and next time I’m definitely setting aside more than the recommended amount. The sauce would also work great with chicken, but why mess with something so close to perfect? After my first bite of these, there was only one thing I could think of saying to Father Leo: BLESS.

Friday, April 1, 2011

Zuppa!

As I’m sure you’ve figured out by now, I really, really love soup. I apologize if you guys have reached soup overload, but I still haven’t reached my fill. As some friends and I were discussing over lunch (which, yes, included soup) at Panera today, soups are great because they are usually very nutritious, filling, inexpensive to make, and are a good way to get your fill of veggies even if you’re normally not a big fan. When Allison and Mohamed came over for dinner a few weeks ago (the same dinner where I made the Korean Beef), we started out with this soup I found in Eating Well Magazine. I highly recommend their daily newsletter – I’ve never had a bad suggestion from them, and they are usually very simple to make!

Garden Tortellini Soup with Italian Meatballs (adapted from here)

What You’ll Need

  • 2 green zucchini, sliced and quartered
  • 2 large carrots, peeled, sliced and quartered
  • 1 large white onion, diced
  • 5 cloves garlic, minced
  • 4 plum tomatoes, diced (about ½ can)
  • 32 oz low-sodium vegetable broth
  • 1 package turkey sausages, Italian style, with the casings removed
  • 2 cups (one small bag) frozen tortellini, preferably spinach & cheese or plain cheese
  • 2 tbsp olive oil
  • 2 tbsp dried rosemary
  • 2 tbsp freshly ground black pepper
  • 2 tbsp red wine vinegar

What To Do

After chopping the vegetables, heat your Dutch oven or large pot plus the olive oil on medium heat. Once it’s hot, sauté the onion and carrot for 1 minute uncovered. Slightly reduce the heat, cover the pot, and cook for about 6 minutes, or until the veggies start to soften and the onion is translucent. Uncover, add the garlic and rosemary, and cook for 1 more minute.

IMG_1903

During the 6 minute cooking period from Step 1, remove the casings from the turkey sausages by cutting a slit down the length of the sausage with a sharp knife. The casing should peel right off, leaving the slightly gooey meat. Divide each sausage into 3-4 small balls and form mini-meatballs. In a medium skillet, cook the meatballs on medium heat, turning frequently so that all sides are evenly cooked. There should be no need for oil as the meatballs will give off their own fat.

IMG_1905

After the meatballs are cooked, remove them from the pan and set aside. Into the pot with the veggies, add your vegetable broth and zucchini; increase the heat slightly and bring the soup to a boil. Once it boils, reduce the heat to medium low and simmer for about 3 minutes.  Add the cooked meatballs, frozen tortellini, and plum tomatoes. Let this cook for about 10 minutes, or until the tortellini plump up and are fully cooked.

IMG_1906

Just before serving the soup, stir the red wine vinegar into the pot and mix well. Serve with crusty bread while piping hot.

IMG_1908

The ratio of tortellini to other ingredients was way off in this bowl of soup, primarily because I was also spazzing and trying to get the other parts of our dinner ready at the same time. This soup was a huge hit – we all had full bowls before dinner and would have kept on eating it if not for the other dishes waiting for us. I’ve experimented with this recipe since my first time trying it, and I think I even improved it a little bit. The second time I made it, I used dried tortellini with a pesto filling, skipped the turkey meatballs, and added an entire bag of baby spinach with the stems removed. I also added the entire can of plum tomatoes, half a bag of frozen peas that I found in the back of my freezer, and 2 heaping tablespoons of Spike Seasoning on top of the spices already listed in this recipe. I suggest playing with the spices to fit your taste – this would obviously be best with fresh herbs, but I tend not to buy them in the winter as I always have leftovers that go bad before I can use them up. I brought this every day for lunch the week after I made it, and all of my coworkers kept asking what I was eating because it smelled so great!