 I would be a poor excuse for a food blogger (and let’s face it, most of the time that’s true) if I didn’t say a few words on the one day a year solely devoted to eating – Thanksgiving. Sometimes it seems like the true meaning of this day has been lost. The concept is simple: give thanks. The gluttonous amount of food that we have come to associate with Thanksgiving is really just a byproduct of every family’s innate desire to feed as a way of giving comfort and showing love. Whether you spent today with your family, friends or loved ones, I hope that at some point you took a moment to think of the things for which you are truly thankful. I, for one, have too many things in my life that I am thankful for to list in this post. I have a wonderful husband, fantastic friends, and a family that means the world to me. Without veering into areas that are beyond the scope of this blog, I will end by saying that every day is a blessing, and I hope to remember and appreciate that as often as possible. I am grateful for each and every one of you who has taken the time to visit and read this blog, and I hope that the love with which my recipes are made finds its way from my family to yours!
Thursday, November 25, 2010
Giving Thanks
Sunday, November 21, 2010
Holy Guacamole!

Last weekend, guest blogger Molly came for a long overdue visit. On Saturday, we went to NYC and ate ourselves into a food coma: we had the world’s best falafel at Taim in the West Village, then trekked our way over to The Doughnut Plant in the Lower East Side for Peanut-Butter-Glazed-and-Blackberry-Jam Filled doughnuts. SO. GOOD.
We had big plans for Sunday – we were going to make a variation on the macaroni & cheese recipe I posted earlier this month. Before we went food shopping on Friday night for the necessary ingredients, Molly happened to find a recipe in her purse for bacon guacamole that she had torn out of the newspaper several months back. This was clearly fate, since a) it was a recipe by Top Chef Master Rick Bayless, one of my favorite chefs, b) it has bacon in it, and c) it has avocado in it. This is, quite clearly, a trinity of awesomeness.
Bacon and Tomato Guacamole
What You’ll Need:
- 5 strips medium-thick bacon OR 8 strips regular-cut bacon
- 3 medium/large ripe avocados (see note)
- ½ medium white onion, chopped into ¼-inch pieces
- 2 or 3 canned chipotle chiles en adobo, removed from the sauce, stemmed, slit open, seeds removed, and finely chopped
- 1 medium-large ripe tomato, cored and chopped into ¼-inch pieces
- ¼ cup (loosely packed) cilantro, roughly chopped, plus extra for garnish
- 2 tbsp freshly squeezed lime juice
- Salt to taste
What To Do:
First, Master Rick instructed us that we should cook the bacon strips in a skillet over medium heat for about 10 minutes, or until they were crispy and browned.


We ended up cooking the entire package of bacon, because we didn’t have the thick-cut type and thought we’d need to add a few extra slices to compensate. Also, we had to taste-test it several times just to make sure it wasn’t poisoned.
While I was cooking the bacon, Molly got to work preparing the avocados. Using a sharp knife, slice carefully through the fruit around the pit, then twist the two halves so they separate. We had purchased the avocados at their perfect ripeness on Friday night, and had originally planned to make this dish on Saturday night after getting home from NYC. However, we were both too tired and WAY too full to make this when we got back, so it waited until Sunday. This was a big mistake – the avocados had over-ripened, and instead of being a lovely green, they were starting to turn brown and get stringy. Not appealing. Molly scraped out the parts that were usable then mashed them in a bowl until they were smooth. We then had to cheat by adding one tub of Trader Joe’s guacamole so that we’d have about the right amount of avocado in proportion to our other ingredients.

As the second batch of bacon was cooking, I got to work chopping the tomato and onion, while Molly prepared the chipotle chiles. You can find these in the international section of your supermarket for about $2 per can.


As the instructions mentioned, you need to open these chiles up and remove the seeds (they are the hottest part). We used 3 peppers and there was plenty of heat in our guacamole; since we both like spicy foods, this suited us just fine, but if you prefer a milder taste then I would suggest using only 2 peppers.
After the peppers were sliced and diced, the bacon was drained on paper towels and chopped into large crumbles.

The onion, tomato, chile peppers, and about ⅔ of the bacon were tossed into the bowl with the avocado. This was topped with a generous helping of the fresh chopped cilantro.

We gently mixed all of the ingredients together so as not to pulverize the tomato until they reached a uniform mixture.

Season the guacamole with salt and lime juice to taste (I hand squeezed a half of a lime into it without measuring and it was just right). Right before eating, top with the rest of the bacon and more cilantro, if desired.

Besides each other, there are few things that Molly and I love more in this world than bacon and avocados (particularly in the form of guacamole), so it was no surprise that this was pretty freaking amazing. The chipotle peppers gave a smoky heat that helps cut the creamy nature of the avocado, while the fresh onion and crispy bacon helped liven up the texture. Our only complaint, if you could call it one, was that there wasn’t quite enough bacon (really, is there such a thing as too much bacon?!). I think this might be because we used regular-cut bacon instead of the thick-cut that Master Chef Rick advised. Regardless, this was extremely tasty, very easy to make, and a perfect munchy dish for a lazy Sunday afternoon. You can find the original recipe for this, and many other sure-to-be-delicious meals, in Rick’s new book, Fiesta at Rick's.
Tuesday, November 16, 2010
Quinoa with Black Beans and Corn
Recently, my dad and uncle were visiting for the weekend, and I made a variation of this for dinner, which they both loved. I decided to try something new for a side dish, based simply on ingredients I had laying around in my cabinets and freezer. I had picked up a box of quinoa (pronounced KEEN-WAH) when a local supermarket was going out of business and it was on sale for 50% off. I’d come across several recipes that incorporated quinoa, but I’d never tasted it before and had no idea what to expect. This recipe called for a lot of flavors that I loved, so I thought it would be a safe bet.
Quinoa with Black Beans and Corn
What You’ll Need:
- ¾ cup uncooked quinoa
- 1 can black beans, drained and rinsed
- 1 ½ cups frozen corn kernels
- 1 onion, roughly chopped
- 4 cloves minced garlic
- ½ cup chopped cilantro
- 1 ½ cups vegetable broth (see Note)
- 1 tsp cumin
- ¼ tsp cayenne or chili pepper
- 1 tbsp olive oil
- Salt and pepper to taste
**Note: It can be difficult to find low-sodium or sodium-free vegetable broth. If, like my dad, you limit your sodium intake, you can easily halve the vegetable broth and use water instead. I made this recipe that way and it did not suffer at all in terms of flavor.
What To Do:

As with any recipe, start out by preparing your vegetables – chop the onion and mince the garlic. These will then get sauteed in the olive oil in a skillet on medium heat until they both begin to soften and turn golden brown.
Next, measure out the quinoa – even though it looks like a small amount it expands like rice as it cooks and makes way more than you think it will!

Add the quinoa and the vegetable broth to the skillet, followed by the cumin, cayenne/chili pepper, salt, and pepper. Bring the mixture to a boil, then reduce the heat to medium low and simmer covered for 20 minutes.

After 20 minutes, the quinoa will have absorbed nearly all of the vegetable broth and will be fluffy, round little balls. Add the frozen corn and black beans to the pan and simmer for an additional 5 minutes, or until the corn is heated all the way through. Transfer immediately to a serving dish, then cover with the cilantro for garnish.

I was pleasantly surprised by the amount of flavor this dish had on its own. It was a perfect counterpart to the casserole entree, but it certainly stands up as a main dish on its own. The quinoa has a mild, nutty flavor that reminds me of brown rice, but with a shape/texture more similar to tapioca. I’m a sucker for anything with a black beans/cumin/pepper combination (I’m sure you can see the theme in my recipe choices), but this was a crowd pleaser, so I know it’s not just that I was an easy sell. While this was good hot, I actually liked it even more as a cold salad the next day for lunch. Besides the minimal amount of oil used to initially cook the onion and garlic, this dish is essentially fat free, has a ton of fiber, and is very cheap and quick to make. Quinoa is an extremely versatile grain, and I’m looking forward to incorporating it into more of my meals in the future!
Sunday, November 7, 2010
Homestyle Macaroni & Cheese
Homestyle Macaroni & Cheese
What You'll Need:
1 1/2 lb macaroni elbows
2 lb extremely sharp white cheddar cheese
1 cup shredded Italian cheese blend
1 stick unsalted butter
1 cup white flour
3 cloves minced garlic OR 1 tsp crushed garlic
5-6 cups milk
1 tsp ground black pepper
1/2 tsp ground mustard
1/2 tsp onion powder
1/4 tsp salt
What To Do:
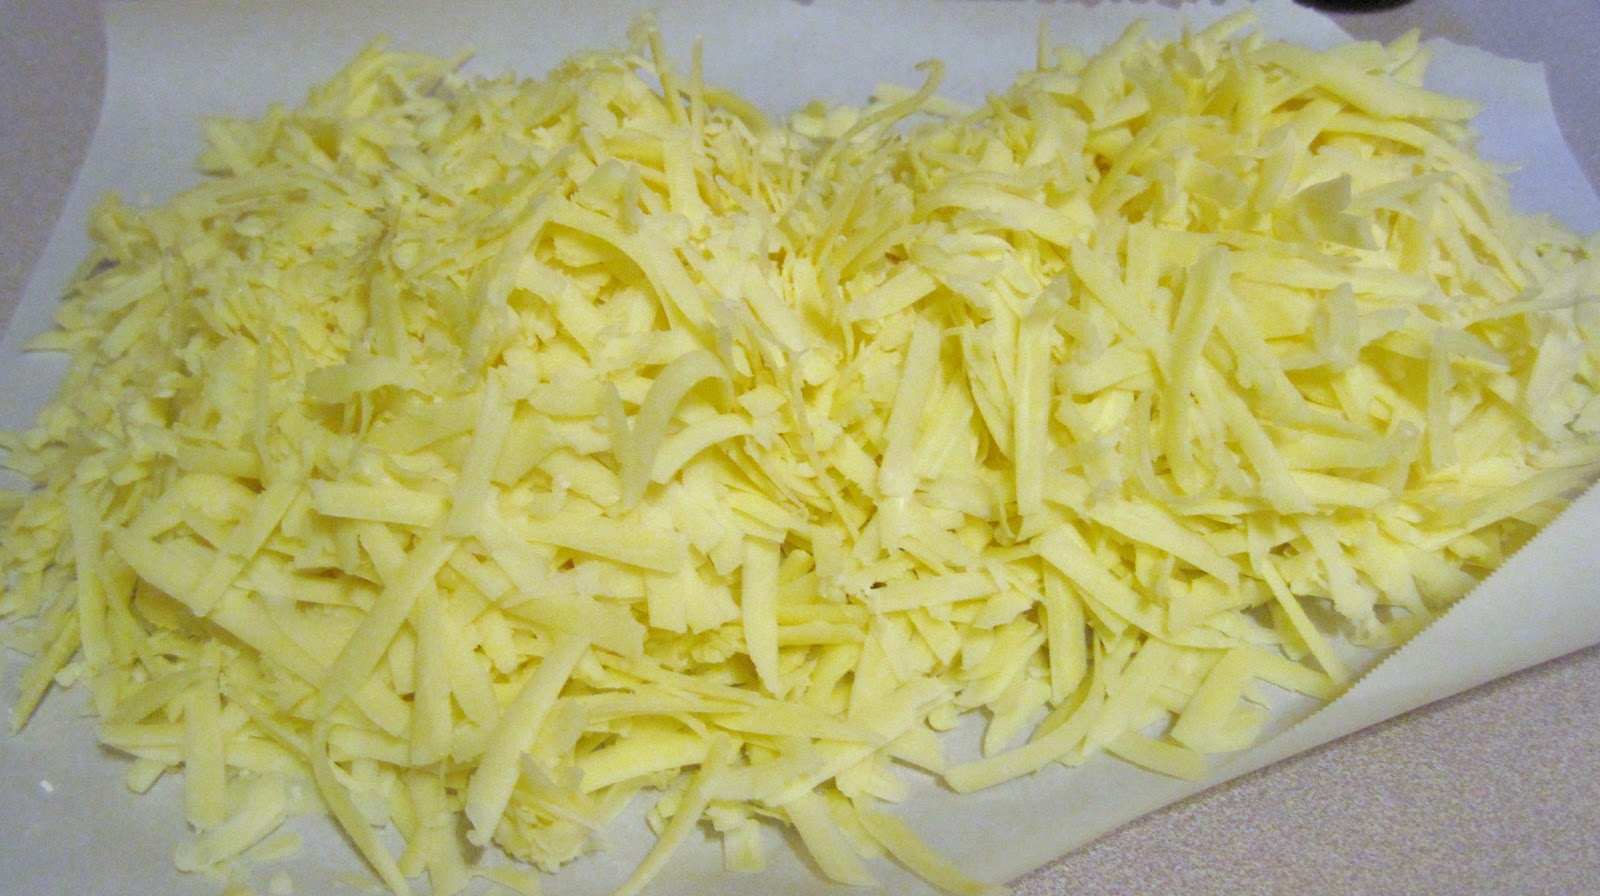
We typically buy the cheddar cheese as a giant block, which then needs to get roughly grated into an enormous pile that just begs for periodic "taste tests".
Start out by precooking the macaroni. I generally cook the pasta for slightly less time than suggested since it will be baked for quite some time, and I don't want it to get mushy. After the pasta is cooked, drain it and leave it to the side until the sauce is ready. Turn on the oven to preheat at 350F.
To make the sauce, start out by melting the stick of butter over medium heat. Also, add your minced/crushed garlic so that it will gently saute while the butter is melting.
 |
| Try not to think about how much butter this calls for. IT IS WORTH IT. |
After the butter is melted and the garlic has been mixed in, add 2-3 tablespoons of the flour to the pot.

Immediately begin whisking the flour and butter together so that they form a thick paste, which becomes the basis for the roux sauce.

Slowly whisk in 1 cup of milk, stirring constantly until it is completely smooth. The most important part of making this recipe is that you NEVER EVER under any circumstances stop stirring. Not stirring leads to a burnt, scorched sauce, and that is bad news bears.
 |
| A nice, creamy roux sauce. |
Keep your heat on low/medium, depending on your stove, so that the sauce is only lightly simmering. It will continually thicken, so keep adding the remainder of the milk until you reach the volume of sauce that you need. For this recipe we ended up using between 5 and 6 cups, but this will also depend on whether you are using skim, low-fat, or whole milk.
Add the mustard, pepper, onion powder, and salt to the sauce, and then mix well. Gradually add one handful of cheese to the pot at a time, waiting to add more cheese until the previous bunch has melted. Like Dory from Finding Nemo said, "Just keep

Taste the sauce to see if the flavor is to your liking. I realize this is hard to do if it's your first time making it, but it should be sufficiently cheesy (who am I kidding, there's never enough cheese) and should have a sharp tang, thanks to the mustard and pepper. If necessary, add more of the various spices to your preference.
Spray 2 casserole dishes or oven-safe bowls with non-stick cooking spray and place them on a large cookie sheet (to catch overflow of the sauce while cooking).

Fill each bowl about halfway with the macaroni, then generously cover the pasta with your cheese sauce.

Mix the sauce into the pasta, then add another spoonful or two to each bowl. It is amazing how much sauce the pasta will suck up. After it's nice and gooey, add more pasta to each bowl so that they are filled almost to the top level. Add more sauce to each bowl to the point that it almost looks soupy; while these bake, the pasta will absorb the sauce, and if you don't have enough at the outset, this will come out dry.
 |
| Yummmmm. |

Bake these for approximately 45 minutes, or until the top is a crispy golden brown.

Full disclosure: this picture was not taken immediately after coming out of the oven. I actually forgot because I was in such a frenzy to eat and I COULD NOT WAIT. You'll understand they torture of smelling this cook for almost an hour and the pleasant torture of anticipating hot, melty, gooey, cheesy goodness in your belly. Thankfully, this recipe makes so much macaroni that we never touched the second dish, so I was able to sneak a picture of this the next day. We had 7 people for dinner, and each of us had a, shall we say, "healthy" serving, so you can imagine how much food this makes. You can easily scale this down for 2-4 people but cutting back on the amount of pasta you cook, and using less butter/flour/milk to make your cheese sauce. I would say that you could use the same amount of cheese no matter what, but that might actually cause a lactose overload. This is an incredibly rich, decadent meal, but as Molly said in her previous birthday cake post, what's the fun in having a birthday if you can't indulge? That being said, when I make this I usually use skim milk, light cheese, and margarine instead of butter. Feel free to experiment with the cheeses you use and the spices you add - no matter what, nothing beats macaroni & cheese!
Friday, November 5, 2010
Birthday Cake, Part 2: Best. Cake. Ever. Edition


Thursday, November 4, 2010
Making a Dump
No, it doesn't refer to poop. In my family, there is a seeming inability to go through a family or holiday dinner without the conversation veering, at one or more points, to poop. Don't ask. For our purposes, we're not going to focus on poop, but on a Dump...Cake! Delicious, delicious dumpyness.
Grandma's Dump Cake
This recipe is courtesy of my grandmother-in-law, who always makes some amazing dessert from a recipe she clipped out of a newspaper at some point in the last 20 years. I finally remembered to write this down the last time we visited her, only to discover that if I had taken 3.2 seconds and done a Google search I would have found it's a very common recipe, and I could have been making this for the last 6 years. FAIL.
What You'll Need
1 can crushed pineapple
1 can cherry pie filling (I used the Lite version made with Splenda)
1 yellow cake mix (I used the store brand)
1 stick unsalted butter
Cooking spray

What To Do:
Preheat your oven to 350F. Spray a cake pan thoroughly with the cooking spray, then DUMP the crushed pineapple into the bottom (don't drain them first!).
 | ||
| T or F: This looks like horseradish. |
 | ||
| I was sorely tempted to start eating the cherries. |

At this point, I popped the cake pan into the oven, toodled off to do something else, then rushed back because I realized I'd forgotten the butter.
 |
| And lo, there was butter, very thinly sliced. |
 |
Have you figured it out yet? This is called a DUMP cake because all you have to do is DUMP the ingredients into the pan. Genius!
After averting the butter disaster, the dump cake baked for about 40 minutes, which was long enough for the top to get a nice, golden brown crust.

For some reason, it looks like I just drizzled maple syrup all over the top of this cake. In reality, the butter melts into the cake mix and it cooks into a soft, puffy top layer. Since the cake was so damn yummy, I dove into an enormous slice and completely forgot to take a picture. Seriously, this cake disappeared in about 3 or 4 days between the two of us. It's best served warm, and I especially like it with some whipped cream on top. I think next time I'm going to try this with blueberries, since they're my favorite fruit, but the acidity of the pineapple balances well with the sweetness of the cherries. This takes about 5 minutes to make, and just as short a time for it to disappear. It's definitely one of my favorites, and if anyone tries making this with something besides cherries, I'd love to hear how it turns out!